This is a complete guide to packaging and installing your own software on Ubuntu and other Debian-based systems using .deb files. By the end, you will be able to:
- Create simple .deb packages with your own software, installed to the location of your choice
- Create a (moderately) secure server that makes this software easily available to you (but not others) over the Internet
- Cryptographically sign your software packages so you don’t have to add [trusted=yes] to your package source files
- Install and uninstall your software using the Ubuntu package management system (sudo apt install my-custom-package, sudo apt remove my-custom-package)
- Release updated versions of your packages so you can easily switch between versions
I assume basic Linux usage and familiarity with accessing Linux servers over SSH.
Creating a server
You will need a server and a domain name. I use Linode and domain.com. We will create a $5/month “Nanode” server on Linode running Ubuntu 19.10 and buy a domain for it on domain.com. In this guide:
- The domain you bought will be my-domain.com
- The IP address of the Linode server will be 11.22.33.44
Linode is very easy to use and has excellent guides. Create an account and then create a “Nanode” server. You will need to select Ubuntu 19.10 as the Image, choose the Region where the server will be hosted and choose a root password. You can also add in SSH keys if you have one.
Once the Nanode is created, find the IP address in the Linode management page for this server on the right:

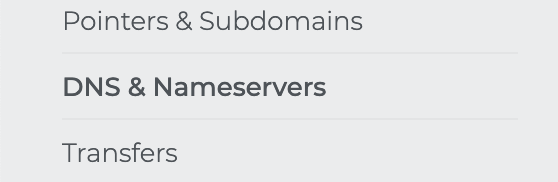
Then go to domain.com and buy “my-domain.com”. Once bought, go to the Management page for this domain and click DNS & Nameservers on the left:
Find the Add DNS Record button and click it:

Then create an A-name record for your server that looks like this:
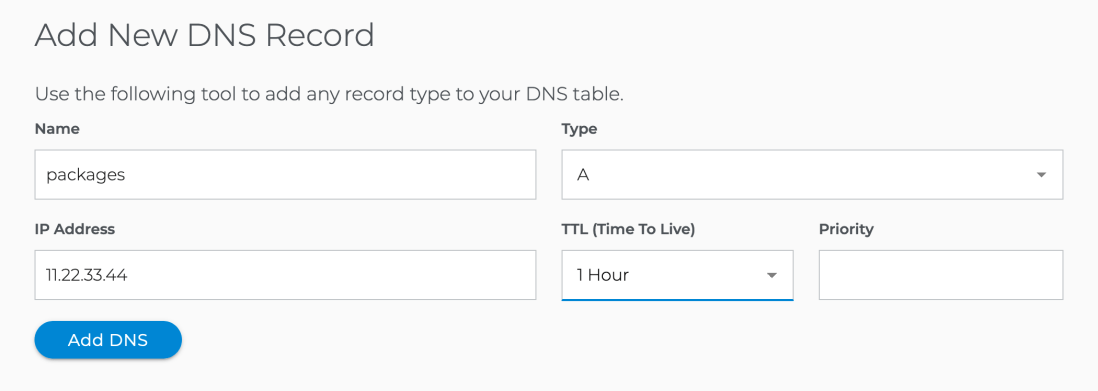
After a short time, you will be able to ping your Linode server using ping packages.my-domain.com and SSH into the server using ssh root@packages.my-domain.com
You can optionally create a custom user, disable root SSH access and enable key-only SSH login to make your server more secure. Many excellent guides are available.
Create your software packages
After logging in to your packaging server, create a simple package. As an example, we will create a package called my-custom-package that installs a simple script in /usr/bin called my-custom-script. We will follow a simplified version of the procedure on linxuconfig.org.
Create a directory called my-custom-package:
mkdir my-custom-package
We will also need to create a DEBIAN directory inside that holds the instructions for the dpkg-deb tool:
mkdir my-custom-package/DEBIAN
And, inside this DEBIAN directory, we will need a file called control that has the dpkg-deb tool’s instructions for making the .deb package. This file needs to contain:
Package: my-custom-package
Version: 1.0
Section: custom
Priority: optional
Architecture: all
Essential: no
Installed-Size: 1024
Maintainer: my-email@my-domain.com
Description: My custom package
Now, we will add the files that will be installed by the package. The system is simple: if you want the package to install a file called my-custom-command into /usr/bin, then create the directories my-custom-package/usr/bin and put a file called my-custom-command into that directory. To create the directories:
mkdir -p my-custom-package/usr/bin
Then create a file called my-custom-package/usr/bin/my-custom-file. In this example, this will be a simple shell script that outputs “It works!”. The file contents should look like this:
#!/bin/bash
echo "It works!"
We also want to make this file executable so that it can be used as a normal command. To do this, run:
chmod +x my-custom-package/usr/bin/my-custom-command
We can now create the package! Run the following command to create the .deb file:
dpkg-deb --build my-custom-package
This will create a file called my-custom-package.deb. Rename it with the version number before doing anything else:
mv my-custom-package.deb my-custom-package-1.0.deb
Creating a “secure” package repository with Apache and Lets Encrypt
We want to easily install and update our software over the Internet, but we don’t want other people to be able to access our packages. To do this, we will:
- Create an Apache web server on packages.my-domain.com
- Encrypt access to the web server using Lets Encrypt and HTTPS
- Add a simple username and password to https://packages.my-domain.com
First, install Apache:
sudo apt install apache2
Then create a directory for hosting the files:
sudo mkdir /var/www/packages.my-domain.com
Remove the default Apache site configuration:
sudo rm /etc/apache2/sites-available/*
sudo rm /etc/apache2/sites-enabled/*
Then create a file called /etc/apache2/sites-available/packages.my-domain.com.conf with the following contents:
<VirtualHost *:80>
ServerAdmin my-email@my-domain.com
ServerName packages.my-domain.com
ServerAlias www.packages.my-domain.com

ErrorLog ${APACHE_LOG_DIR}/error.log
CustomLog ${APACHE_LOG_DIR}/access.log combined

DocumentRoot /var/www/packages.my-domain.com

<Directory /var/www/packages.my-domain.com>
  AllowOverride All
</Directory>
AccessFileName .htaccess
</VirtualHost>
Don’t forget to make sure this file ends with .conf or Apache won’t see it!
Enable the site using these commands:
sudo a2ensite packages.my-domain.com
sudo systemctl reload apache2
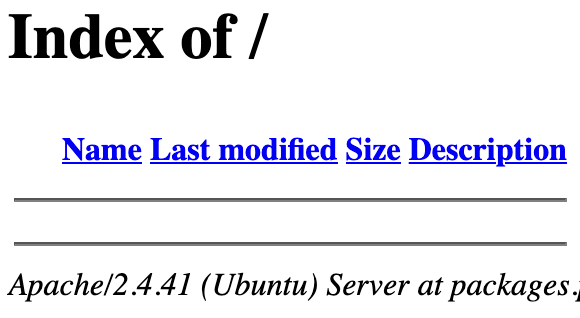
You should now be able to open packages.my-domain.com in your browser and see this page:
To keep our packages private, we need to add https encryption and a username and password to this site. To add https, install Lets Encrypt’s certbot tool:
sudo apt install python-certbot-apache
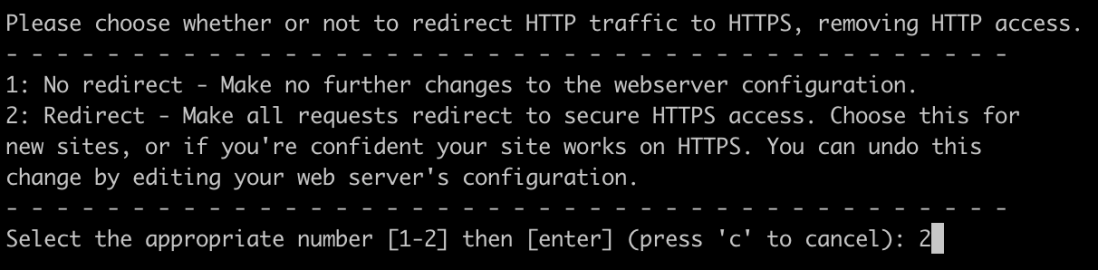
Then use the interactive tool to make sure packages.my-domain.com uses https. Run this and select 2 at the end when prompted to redirect using SSL:
sudo certbot --apache -d packages.my-domain.com
You should now see HTTPS enabled in your browser when accessing packages.my-domain.com.
Now that the site is encrypted, we can make access reasonably secure using HTTP Basic authentication. Go to the site directory:
cd /var/www/packages.my-domain.com
Now create a file called .htaccess in /var/www/packages.my-domain.com with the following contents:
AuthName "Login to access packages"
AuthType Basic
AuthUserFile /var/www/packages.my-domain.com/.htpasswd
require user myuser
We also need to create a password. Run the following command and enter mypassword when prompted:
sudo htpasswd -c .htpasswd myuser
Then restart Apache:
sudo systemctl restart apache2
Make sure that the site requires a username and password of myuser and mypassword by opening an incognito window and going to https://packages.my-domain.com. Your browser may cache the page and let you in without a password after Apache is restarted, so an incognito window is a quick way to get around this.
Creating a signed package repository
Ubuntu complains if you don’t use cryptographically signed packages. You can get around this by adding [trusted=yes] when adding your repository to a new computer but we will sign our packages using the guide on ubuntu.com.
This section should be done as the root user:
su root
First, create a signing key using gpg. Follow the prompts and don’t enter a password so we can script later commands for convenience:
gpg --gen-key
Change to the package directory and export your public key:
cd /var/www/packages.my-domain.com
gpg --output key.gpg --armor --export
This will create a key.gpg file in /var/www/packages.my-domain.com that will start with:
-----BEGIN PGP PUBLIC KEY BLOCK-----
When we install our software on other computers, we will need to add this key to stop apt complaining. That will be explained after the package repository has been set up.
For now, create a directory to store our package:
mkdir /var/www/packages.my-domain.com/all
Then copy my-custom-package-1.0.deb into /var/www/packages.my-domain.com/all.
To sign our package, we will need to install the dpkg-sig tool:
sudo apt install dpkg-sig
To make the package repository creation process easier, we will make a script. Create update_repo.sh in your home directory with the following contents:
#!/bin/bash
cd /var/www/packages.my-domain.com
# Sign each .deb package
find . -type f -name "*.deb" -exec dpkg-sig --sign builder {} \;
apt-ftparchive packages . > Packages
gzip -c Packages > Packages.gz
apt-ftparchive release . > Release
rm -f Release.gpg
gpg -abs -o Release.gpg Release
rm -f InRelease
gpg --clearsign -o InRelease Release
Make this update_repo.sh executable and run it:
chmod +x update_repo.sh
sudo ./update_repo.sh
Congratulations! You now have an operational package repository!
Install your packages on another computer
To test your package repository, we need to add it to another Ubuntu computer. First, we will install the signing key from packages.my-domain.com:
wget -O - https://myuser:mypassword@packages.my-domain.com/key.gpg | sudo apt-key add -
If you get an error here, make sure the username and password and URL are correct. Note that other people will not be able to access the package site without the username and password.
Next, add the repository to the computer using apt-add-repository:
sudo add-apt-repository 'deb https://packages.my-domain.com /'
We could have added the username and password inline but more recent versions of Ubuntu like to have the login details in a separate file in /etc/apt/auth.conf.d. As root, create the file /etc/apt/auth.conf.d/packages.my-domain.com.conf with the following contents:
machine packages.my-domain.com login myuser password mypassword
We can now update the package list as normal:
sudo apt update
To install our package:
sudo apt install my-custom-package
To check it works, run:
my-custom-command
You can also remove the package as normal using:
sudo apt remove my-custom-package
Releasing an updated version of your package
If we want to release a new version of our package, we can follow the following procedure on our package server. Go back to where you created the package and edit my-custom-package/usr/bin/my-custom-command to look like this:
#!/bin/bash
echo "It works version 1.1!"
Now edit my-custom-package/DEBIAN/control and change the version to 1.1:
Package: my-custom-package
Version: 1.1
Section: custom
Priority: optional
Architecture: all
Essential: no
Installed-Size: 1024
Maintainer: my-email@my-domain.com
Description: My custom package
Create the new package using:
dpkg-deb --build my-custom-package
Then rename and move it to the package repository:
mv my-custom-package.deb /var/www/packages.my-domain.com/all/my-custom-package-1.1.deb
Update the package repository using our script:
sudo update_repo.sh
On the other computers that are using our package repository, we can now see both versions of the package:
sudo apt update
We should see a message that a new version of a package is available:
1 package can be upgraded. Run 'apt list --upgradable' to see it.
We can check the available versions using:
sudo apt-cache policy my-custom-package
This will output:
my-custom-package:
Installed: 1.0
Candidate: 1.1
Version table:
1.1 500
500 https://packages.my-domain.com Packages
*** 1.0 500
500 https://packages.my-domain.com Packages
100 /var/lib/dpkg/status
You can now update your package using:
sudo apt install my-custom-package
Or downgrade it using:
sudo apt install my-custom-package=1.0
Conclusions
Setting up a package repository takes an hour or two, but there are some advantages:
- You can manage your software using standard tools
- The extensive Debian/Ubuntu infrastructure for package management is available
- You have all your versions available for easy downgrades
- More automated installation means faster setup and fewer mistakes
There are lots of guides online for building more complicated packages, building packages for specific CPU architectures and other ways of hosting packages like sftp and ssh.
Things can get more complicated when the server has more than one GPG key.
I hope this end-to-end guide will help people make use of the packaging system that is built in to Debian, Ubuntu and other derivatives for their own projects and organisations.
